Freeway Pro is a WYSIWYG HTML editor for Mac. This tutorial will guide you how to insert a jQuery slider created with Amazing Slider to Freeway Pro.
Step 1 – Create jQuery Slider in Amazing Slider, and Publish to the Site Folder of your Freeway
Pro project
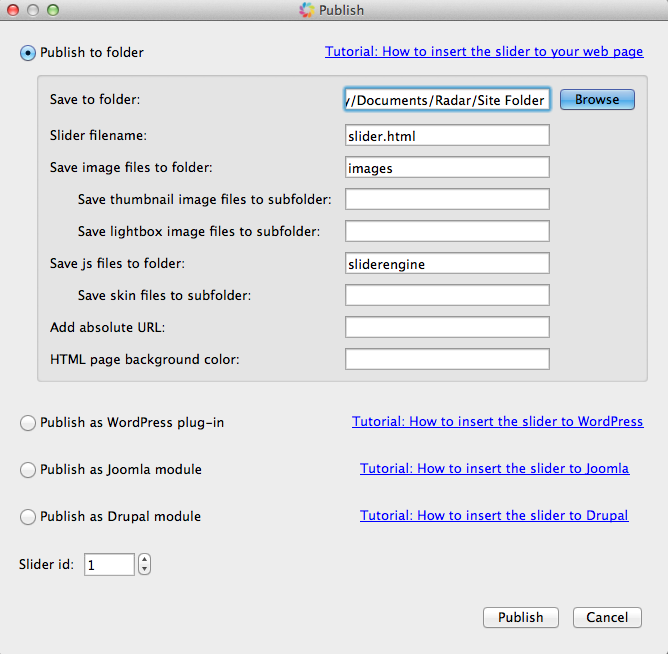
In Amazing Slider, design your slider, in Publish dialog, choose the option Publish to folder, then select the Site Folder of your Freeway Pro project, and publish it.
Step 2 – Insert HTML codes to your webpage
In Finder, go to Site Folder of your Freeway Pro project, open the file slider.html with a text editor. The file slider.html is created by Amazing Slider in step 1.
Please note, by default, TextEdit on Mac is not a plain text editor or HTML editor. If you want to use TextEdit, you can follow this tutorial to make it as an HTML editor: http://mac.tutsplus.com/tutorials/productivity/quick-tip-configure-textedit-for-coding-html/. Then you can use it to open the slider.html file and copy the HTML codes.
You can also try TextWrangler https://itunes.apple.com/au/app/textwrangler/id404010395?mt=12 or TextMate http://macromates.com/.
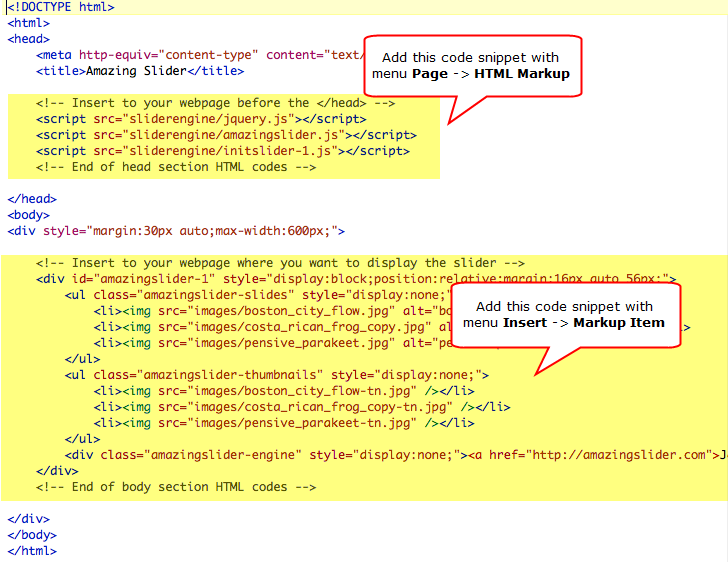
There are two code snippets you need to insert to your webpage.
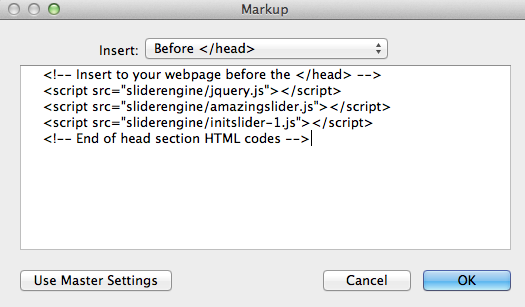
In Freeway Pro, choose menu Page -> HTML Markup, select Before </head> and add the first code snippet to the box.
Choose menu Insert -> Markup Item, add the second code snippet to the box. Click Ok then adjust the size and position of the HTML Markup element on the webpage.

Click menu File -> Preview in Browser, the slider should show up and word correctly.
Step 3 – Upload slider folders to your web server
The built-in upload function of Freeway Pro does not upload the “extra” folders to the web server. So to make the slider working online, you need to use a FTP client software to upload the two folders sliderengine and images to the root folder of your web server. These two folders are created in Step 1.
You can use the free FTP client software FileZilla to do the uploading: https://filezilla-project.org/.