This step-by-step tutorial will guide you how to insert a jQuery Slideshow created with Amazing Slider to Adobe Muse and Adobe Business Catalyst.
Step 1 – Connect to your Adobe Business Catalyst site using FTP client software
For how to connect to your Business Catalyst site with FTP, please view the help document http://helpx.adobe.com/business-catalyst/partner/connecting-site-using-ftp-client.html
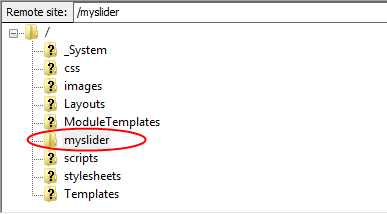
Step 2 – Create a folder on your web server using the FTP client software
Here we create a folder named myslider. We will use this folder name in next step.
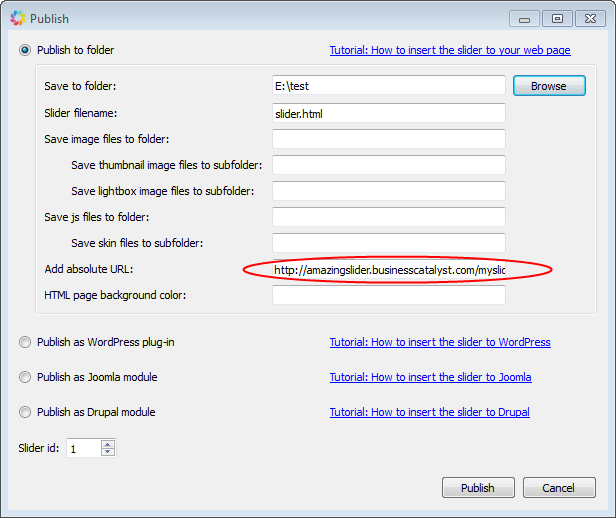
Step 3 – Create and publish your jQuery slideshow in Amazing Slider
In the Publish dialog:
- Click button Browse, choose a local folder to save slider files.
- Remove the default value in the field “Save image files to folder”.
- Remove the default value in the field “Save js files to folder”.
- In field “Add absolute URL”, enter text: http://yourwebsite.com/myslider/. You need to replace “yourwebsite.com” with your own domain name, “myslider” is the folder name we created in step 2.
Step 4 – In your FTP client software, upload all of the generated files to the folder “myslider” which was created in step 2.
After uploading, visit http://yourwebsite.com/myslider/slider.html, the jQuery slideshow should show up and work properly. When visiting the link, you need to replace “yourwebsite.com” with your own domain name.
If it doesn’t work, you need to check each above step, and make sure you have followed it correctly.
Step 5 – Insert the slideshow to your webpage
In this step, you need to insert the slideshow to your webpage.
Open the created slider.html file with a text editor or HTML editor, copy the HTML codes in the body section. The code snippet starts with <!– Insert to your webpage where you want to display the slider –> and ends with <!– End of body section HTML codes –>.
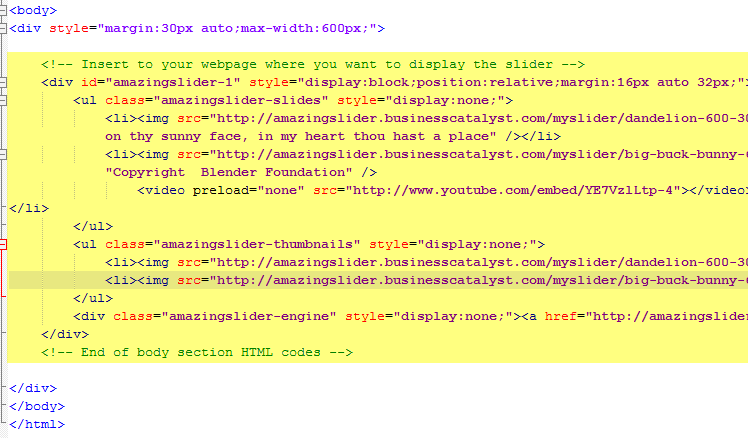
In Adobe Muse, click menu Object -> Insert HTML, paste the above code to the box.

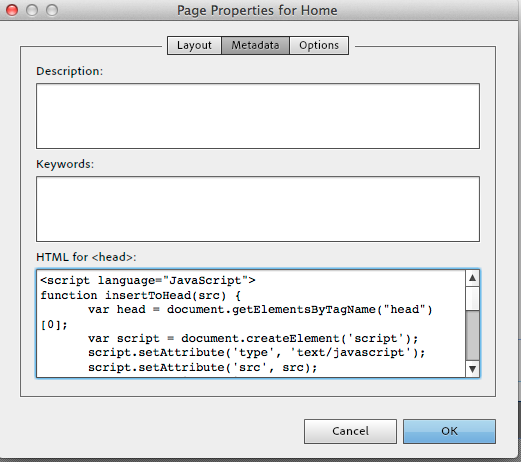
Step 6 – Insert scripts to head section
In Abode Muse, click menu Page -> Page Properties, then click Metadata tag, add the following codes to the HTML for <head> box. You need to replace “yourwebsite.com” with your own domain name.
<link rel="stylesheet" type="text/css" href="http://yourwebsite.com/myslider/amazingslider-1.css">
<script language="JavaScript">
  function insertToHead(src) {
    var head = document.getElementsByTagName("head")[0];
    var script = document.createElement('script');
    script.setAttribute('type', 'text/javascript');
    script.setAttribute('src', src);
    head.appendChild(script);
  };
  var jQueryLoaded = setInterval(function(){
    if (typeof jQuery !== 'undefined')
    {
      clearInterval(jQueryLoaded);
      insertToHead('http://yourwebsite.com/myslider/amazingslider.js');
    }
  }, 500);
  var AmazingSliderLoaded = setInterval(function(){
    if ((typeof jQuery !== 'undefined') && jQuery.fn.amazingslider)
    {
      clearInterval(AmazingSliderLoaded);
      insertToHead('http://yourwebsite.com/myslider/initslider-1.js');
    }
  }, 500);
</script>