Firefox and HTML5 Video

Question:

Good Morning,

I downloaded the free version of AmazinSliders to test it. An I have noticed the following. When I have a video playing on the slider it works fine in all other browsers except Firefox. I started with version 30.0 and it only shows a black box where the video should be. I then updated Firefox to version 31.0 with the same results.

I was wondering if you guys are aware of that behavior and if so do you have a fix for it.

Answer:

Firefox does not support mp4 as its HTML5 format.

If you only provide one mp4 format, the slider will use Flash to play mp4 on Firefox.

Please upload the slider files to your web server and test online. Flash video playing may not work when you directly open the file from local hard disk.

If you want to use HTML5 on Firefox, you need to provide an alternative WebM video. You can add the WebM video in the Add Slides dialog, “Add Video”. You can use http://firefogg.org/ to convert your mp4 to webm format.

Use a URL address to an image instead of having it located in a folder on the server

Question:

I’m interested in your commercial version of Amazing Slider, but would like to know first if I can use a URL address to an image instead of having it located in a folder on the server.

Answer:

You can add an image from your local computer, after you create the slideshow, you can open the generated file “slider.html” with a text/HTML editor, and edit the image link to your own URL address.

For example, in the following HTML code, you can change the image address to your own URL address:

<!– Insert to your webpage where you want to display the slider –>
<div id=”amazingslider-1″ style=”display:block;position:relative;margin:0px auto 0px;”>
<ul class=”amazingslider-slides” style=”display:none;”>
<li><img src=”images/night-in-the-city-600-300.jpg” alt=”City Night” /></li>
<li><img src=”images/sakura-trees-600-300.jpg” alt=”Sakura Trees” /></li>
<li><img src=”images/sea-side-600-300.jpg” alt=”Sea Side” /></li>
</ul>
<ul class=”amazingslider-thumbnails” style=”display:none;”>
<li><img src=”images/night-in-the-city-600-300-tn.jpg” /></li>
<li><img src=”images/sakura-trees-600-300-tn.jpg” /></li>
<li><img src=”images/sea-side-600-300-tn.jpg” /></li>
</ul>
</div>
<!– End of body section HTML codes –>

Amazing Slider License issue

Question:

I am a freelance we site designer an I am looking to purchase an image slide creator in order to speed up my work time on many clients websites. Would the slider product suit my needs? Also If one of my clients wanted to take his website elsewhere following my completion of work on his website including producing an image slider with the Amazing Slider software. Can I pass their website to another designer with the image slider code in it or do they need to purchase an additional licence?

Answer:

Would the slider product suit my needs?

You can easily create image sliders with Amazing Slider. We offer free version which you can download at https://amazingslider.com/downloads/. You can try it before deciding to upgrade to the commercial version. The comparison between the free version and commercial version is at: https://amazingslider.com/order/.

Can I pass their website to another designer with the image slider code in it or do they need to purchase an additional licence?

Yes, you can pass the created slider code and files to other designers. But you can NOT pass the software itself.

Two jQuery Sliders on one Volusion website

Question:

I am having problems running two sliders on my Volusion site. As you can see, with 2 sliders running, one on each page….the home slider takes on the size of the slider on the product page. Thank you for your help.

Answer:

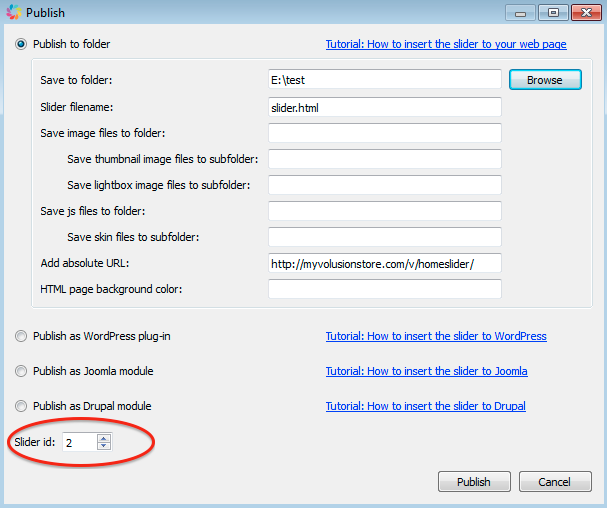
If you want to add multiple sliders to one website, when creating the slider, in the application, Publish dialog, you need to configure a different “Slider id” for each slider.

When inserting the HTML code to your web page, for the second and after sliders, you also need to remove the second jquery.js and amazingslider.js from the head section codes:

<!– Insert to your webpage before the </head> –>
<script src=”http://myvolusionstore.com/v/homeslider/jquery.js”></script>
<script src=”http://myvolusionstore.com/v/homeslider/amazingslider.js”></script>
<script src=”http://myvolusionstore.com/v/homeslider/initslider-1.js”></script>
<!– End of head section HTML codes –>

<!– Insert to your webpage before the </head> –>
<script src=”http://myvolusionstore.com/v/homeslider/jquery.js”></script>
<script src=”http://myvolusionstore.com/v/homeslider/amazingslider.js”></script>
<script src=”http://myvolusionstore.com/v/homeslider/initslider-2.js”></script>
<!– End of head section HTML codes –>

For tutorial about insert jQuery slider to your Volusion website, please view tutorial: https://amazingslider.com/how-to-insert-amazing-slider-to-volusion-website/

Adding both Amazing Slider and Amazing Carousel to Volusion website

Question:

Hello, I recently purchased a commercial bundle of the amazing slider and carousel. I am having a problem though, I want to run the amazing slider on the homepage of my Volusion site, and the Amazing Carousel on a separate page within the same site. Is this possible? I have entered the code, but only the amazing slider works because it is the last script before the close of the </head> tag. Please let me know what can be done about this! Thank you very much for your support.

Answer:

When adding the head section code, please remove the second line of jquery.js.

For example, for the following code, you need to remove the line marked by red:

<!– Insert to your webpage before the </head> –>
<script src=”http://yourvolusionsite.com/v/carousel/jquery.js”></script>
<script src=”http://yourvolusionsite.com/v/carousel/amazingcarousel.js”></script>
<link rel=”stylesheet” type=”text/css” href=”http://freeshipfit.com/v/carousel/initcarousel-1.css”>
<script src=”http://yourvolusionsite.com/v/carousel/initcarousel-1.js”></script>
<!– End of head section HTML codes –>

<!– Insert to your webpage before the </head> –>
<script src=”http://yourvolusionsite.com/v/homeslider/jquery.js”></script>
<script src=”http://yourvolusionsite.com/v/homeslider/amazingslider.js”></script>
<script src=”http://yourvolusionsite.com/v/homeslider/initslider-1.js”></script>
<!– End of head section HTML codes –>

How to add a jQuery slider to Weebly website

Weebly is an online website editor with an easy-to-use drag & drop user interface. This tutorial will guide you how to add a jQuery Slider created with Amazing Slider to your Weebly powered website.

To follow the tutorial, please use Google Chrome as your web browser.

Step 1 – Get the upload path of your Weebly website

In your Weebly dashboard, click Design from the top menu, then click Edit HTML/CSS from the left sidebar.

Click Add new file(s) from the sidebar, then upload an image, any image file you like. After the uploading is finished, click and select the image, then in the right panel, right click the image, and select Open Image in New Tab. If you don’t see the item in the popup menu, please switch your web browser to Google Chrome.
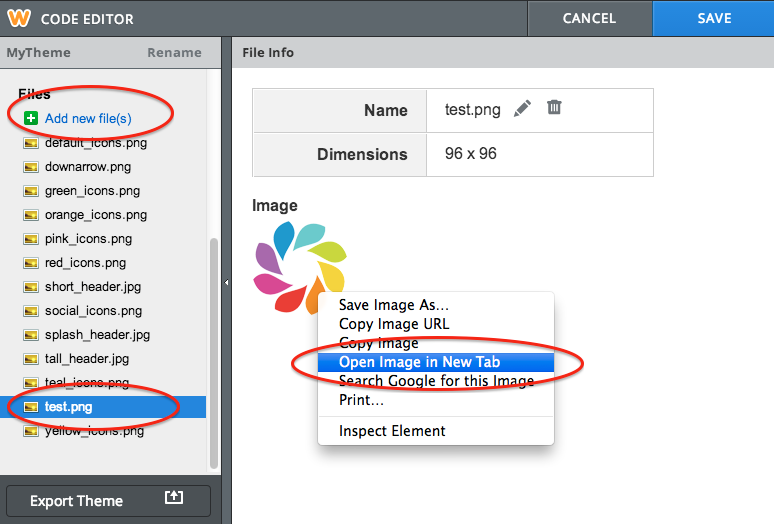
After opening the image in a new tab, copy the image path URL. Only copy the image path, do not copy the image filename and extension.

The image path URL may be something like:

http://www.weebly.com/uploads/3/2/0/3/32030229/custom_themes/274482990858346085/files/.

We will use this URL in the next step.

Step 2 – Create jQuery Slider with Amazing Slider

Design your slider in Amazing Slider, then in the Publish dialog, choose the option “Publish to folder”.
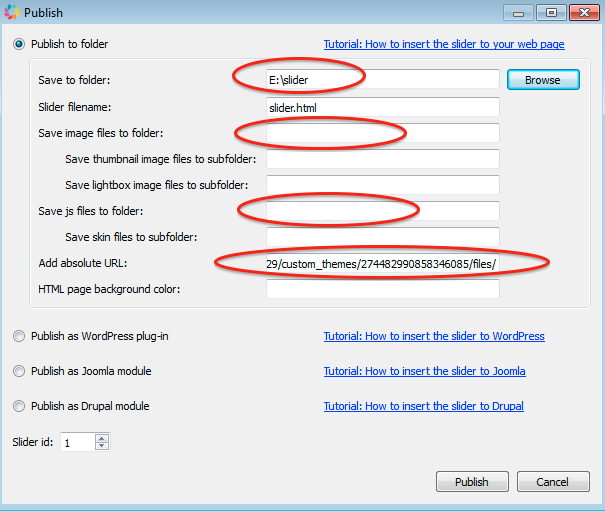
  • Click the Browse button, select a folder to save the slideshow. It’s better you use an empty folder, so you will know which files are created by the application.
  • Empty the field “Save image files to folder”.
  • Empty the field “Save js files to folder”.
  • Copy the image path URL we got in step 1 to the field “Add absolute URL”.

Click the Publish button and create the slider.

Step 3 – Upload jQuery slider files to Weebly

In your Weebly dashboard, click Design from the top menu, then click Edit HTML/CSS from the left sidebar.

Click Add new file(s) from the sidebar, select and upload all of the files created in the above step.

Step 4 – Insert the jQuery Slider to your Weebly webpage

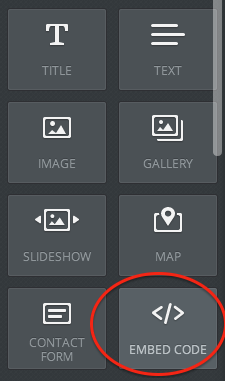
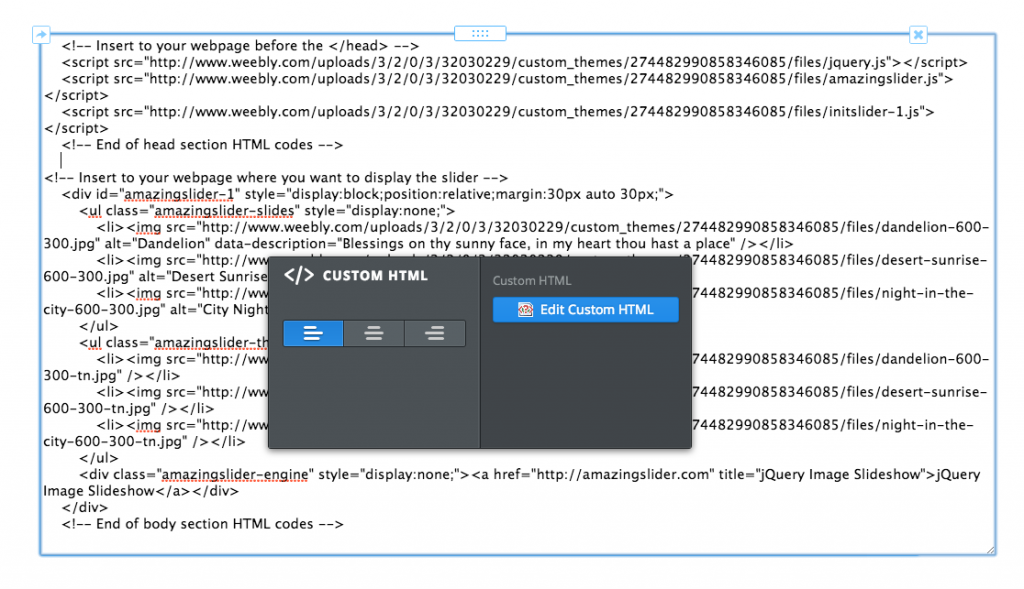
In your Weebly dashboard, edit your page, drag the element EMBED CODE to your webpage.
In step 2, the application has created a file “slider.html”. Open the generated slider.html from local hard disk with a text editor, for example, Notepad on Windows.

There are two code snippets, copy both code snippets to the EMBED CODE.

Only copy the required code(marked by red in the following picture), do not copy the code between the code snippets.

Publish your website, the jQuery slider should be up and running.
Add web link to slider images

Question:

Hello, I’m interested in using your slider but can you let me know if I can make the images link to different pages on my site please.

Answer:

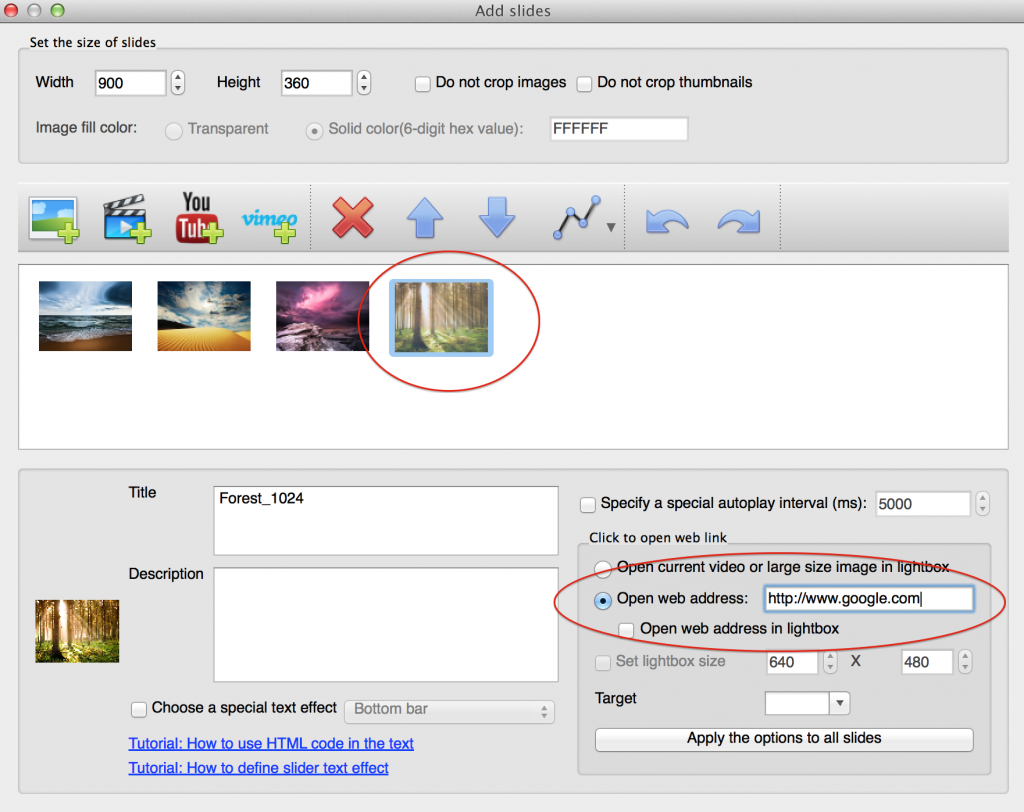
In Add Slides dialog, after you add your images, click an image and select it, then you can enter your link in the bottom fields.

You can enter a different link for each of your images.

Change the size of slider

Question:

I am about to purchase your excellent product.

My question, Can I make the size of the slider smaller? I have the size of the slides set at 160 x 120 and it looks too big.

I have many images that I want to put into the slider, do they have to be a specific size and resolution? In the program some of them appear not to fit the size or the quality looks very bad.

Looking forward to working with you.

Answer:

In the software, Step 1, Add Slides dialog, you can change the width/height there.

When you add images to the slider, if your original image is smaller than the size of the slider, it will be stretched, and may not look good.

So, it’s better your original images can be the same size or bigger than the slider.